简介
前些日子在做功能的时候,感觉工具非常不趁手,决心自己撸个插件改善一下开发效率,于是简单接触了一下 sublime 插件开发的流程,虽然没啥精力折腾复杂的功能,但将折腾的过程记录于此,方便之后心血来潮来一发大的的时候有个参考,涉及的内容不深,仅供入门了解。
sublime api 可参见官网。
How-to-Run
首先是建立插件能够运行的环境,找到 sublime 插件的目录:
# mac
/Users/"User Name"/Library/Application Support/Sublime Text 3/Packages/

# windows
C:\Users\"User Name"\AppData\Roaming\Sublime Text 3\Packages\
在其中建立测试用文件夹,例如:PluginTest,接着通过 sublime 菜单创建示例 plugin 文件保存到测试文件夹:
Sublime -> Tools -> Developer -> New Plugin
文件内容为:
import sublime
import sublime_plugin

class ExampleCommand(sublime_plugin.TextCommand):
    def run(self, edit):
        self.view.insert(edit, 0, "Hello, World!")
接下来,通过 ctrl+` 打开 console,输入:
view.run_command('example') # 取 ExampleCommand 的前缀 example
即可看到该插件的效果:在文件开始处插入 “Hello, World!” :

Sublime 核心组件
在 sublime 中,编辑器自身比较常用并且需要关注的几个类有:
- Window:对应 sublime 中的一个窗口
- View:对应窗口中的每个文本页签
- Selection:编辑器中选中的部分
- Region:指代 buffer 中的一个区域,例如 Region(0, 1) 表示该 View 里的第一个字符
插件 api
command
在前面的示例代码中,使用到了 command 来运行指令,sublime 中共有三种 command (ApplicationCommand,WindowCommand,TextCommand),三者基本是一样的,只是作用域不同:
- ApplicationCommand:作用于整个 sublime 进程
- WindowCommand:作用于每个打开的窗口
- TextCommand:作用于每个 tab
callback
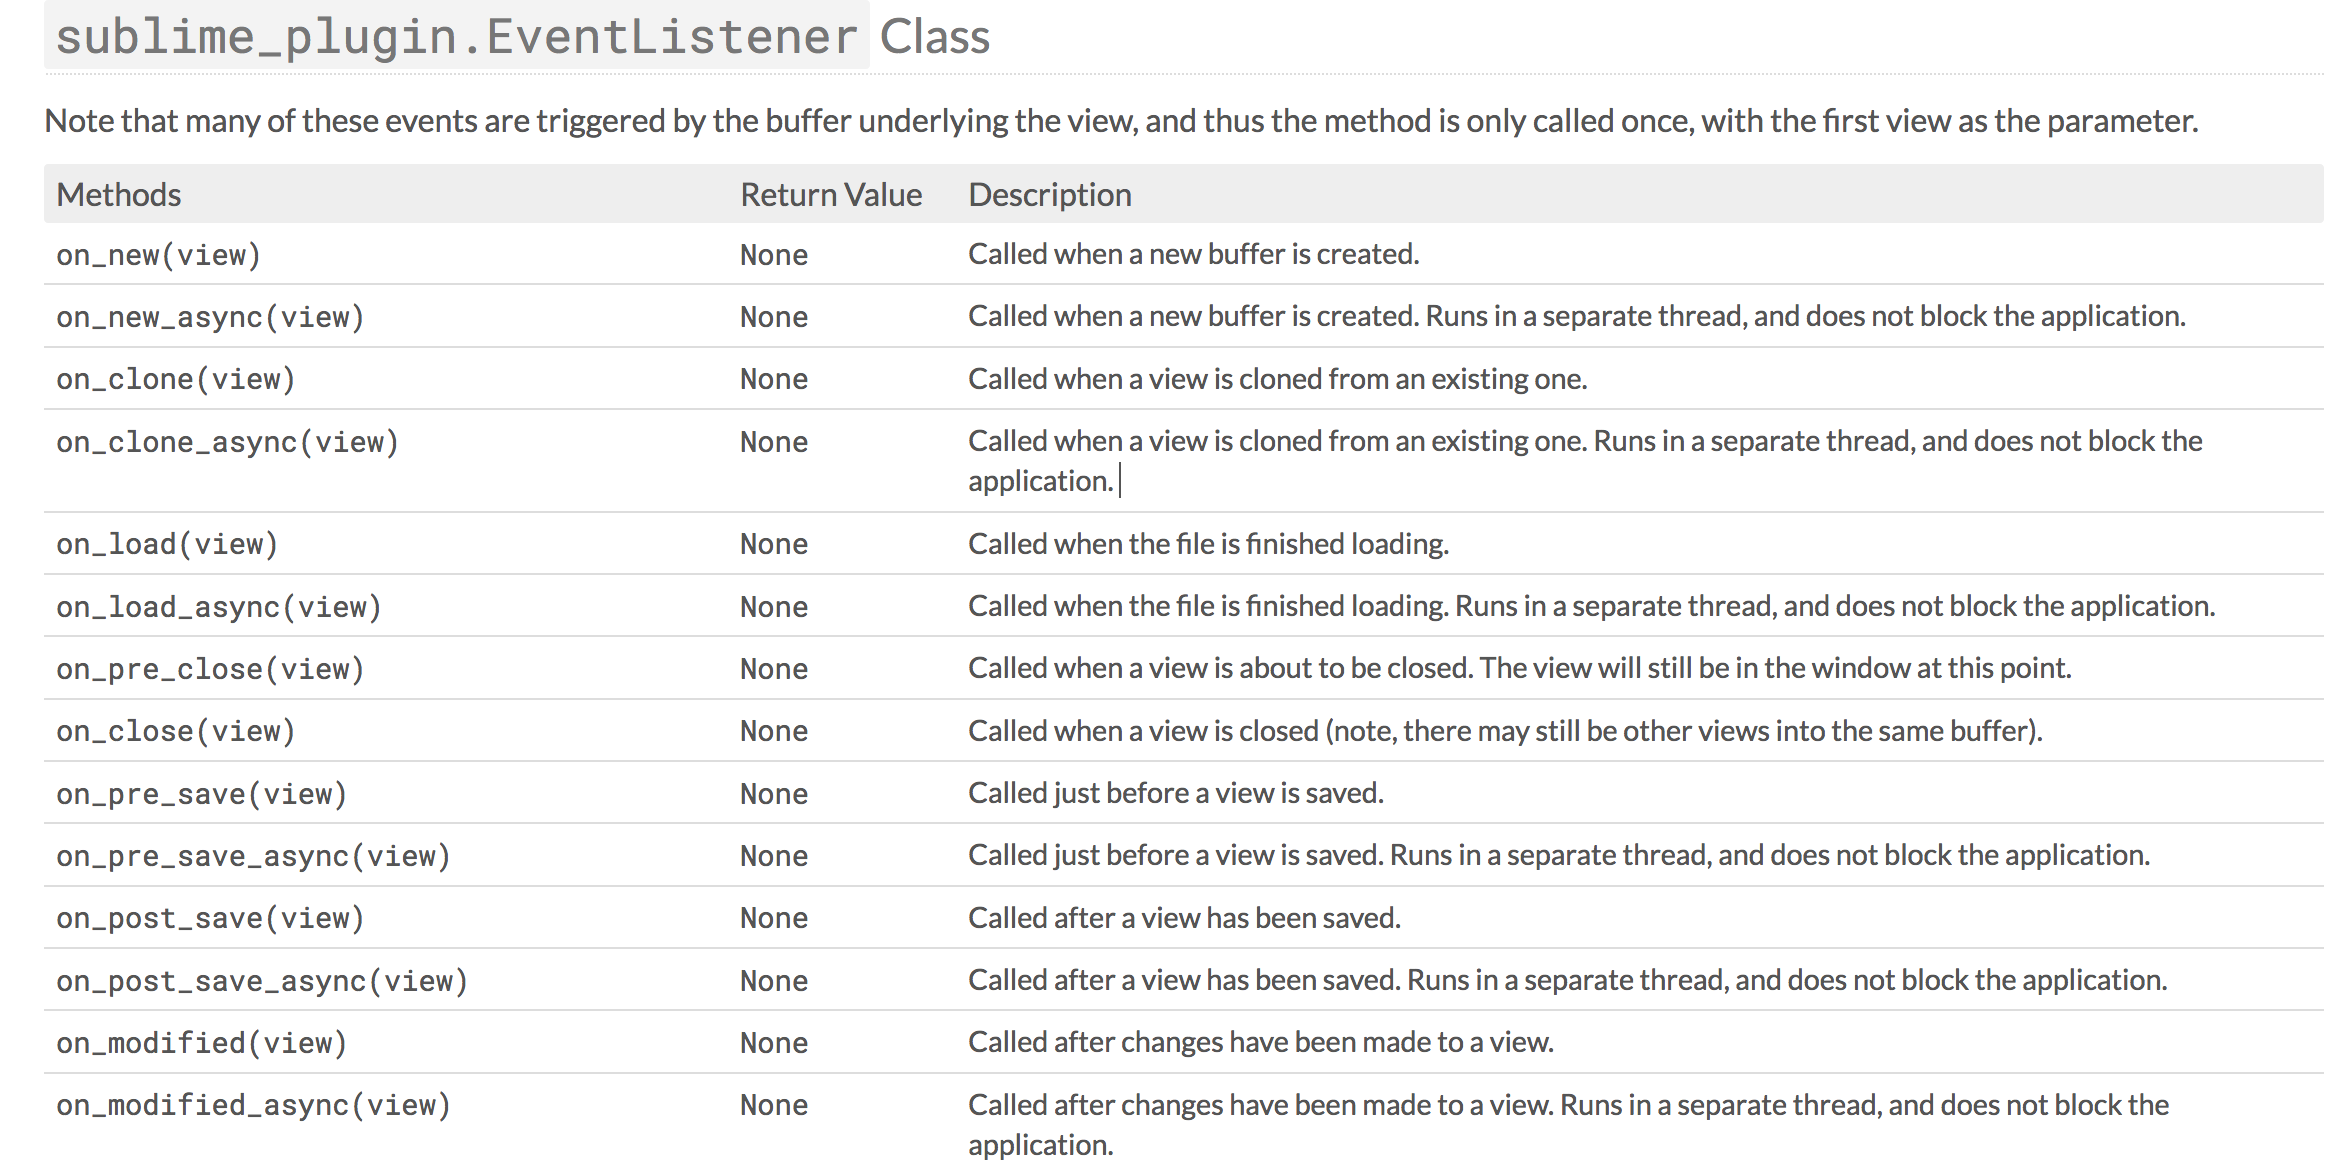
sublime 中很多逻辑的处理都需要依赖回调事件,例如保存的回调、修改的回调等,具体的回调可以在 api 文档中查阅:

使用回调的话需要继承 EventListener 类:
class EventListener(sublime_plugin.EventListener):
    def on_pre_save(self, view):
        print('on_pre_save', view.id(), view.file_name())
实现一个简单的搜索插件
在这里会通过实现一个简单的插件,来了解 sublime 插件的开发流程,该插件的功能是通过快捷键,快速搜索选中的关键词,搜索链接可配置,比如 Google、必应词典、Unity3D API 文档等。
实现代码
代码非常简单,已经加入注释说明,如下:
import sublime
import sublime_plugin
import webbrowser

class SimpleSearchCommand(sublime_plugin.TextCommand):
    urlList = [];
    displayList = [];

    def run(self, edit):
        # 如果有选中的文字,则直接进行搜索;如果无选中文字,则打开输入框输入文本进行搜索
        selection = self.view.substr(self.view.sel()[0]);
        if len(selection) == 0:
            self.view.window().show_input_panel("Search For:", selection, self.on_input_done, None, None);
        else:
            self.on_input_done(selection);

    def on_input_done(self, string):
        # init
        self.searchStr = string;
        self.urlList = [];
        self.displayList = [];

        # 从设置中加载配置的搜索选项,并创建一个 quick panel
        settings = sublime.load_settings('SimpleSearch.sublime-settings');
        self.urlList = settings.get('custom_url');
        if self.urlList is not None:
            for url in self.urlList:
                display = [
                    url["title"] + " : \'" + self.searchStr + "\'",
                    url["content"],
                ];
                self.displayList.append(display);

        # 设置 quick panel 的回调,如果选择完毕则进行搜索
        self.view.window().show_quick_panel(self.displayList, self.on_select_done, 0, 0, None);

    def on_select_done(self, index):
        # cancel
        if index == -1:
            return;

        # search
        searchUrl = self.urlList[index]["url"];
        DoSearch(self.searchStr, searchUrl);


def DoSearch(searchStr, searchUrl):
    # 进行搜索的核心代码其实只有一行:
    webbrowser.open_new_tab(searchUrl.format(searchStr));
    return;
搜索配置
代码中通过配置文件加载了不同的搜索方式,而添加配置文件的方式也很简单,直接在插件代码所在文件夹下创建配置文件 SimpleSearch.sublime-settings :
{
    "custom_url":
    [
        {
            "title": "Unity3D",
            "content": "unity.com",
            "url": "http://docs.unity3d.com/ScriptReference/30_search.html?q={0}",
        },
        {
            "title": "Google",
            "content": "google.com",
            "url": "https://www.google.com/search?q={0}",
        },
        {
            "title": "Bing Dict",
            "content": "dict.bing.com",
            "url": "https://cn.bing.com/dict/search?q={0}",
        },
    ]
}
title 字段对应的是 quick panel 中显示的标题,content 为 quick panel 中的说明信息,url 即搜索用的 url:

快捷键配置
为了方便使用,还可以配置专用的快捷键,添加快捷键配置也是创建一个配置文件,同样,在插件代码所在路径添加 Default (OSX).sublime-keymap:
[
    { "keys": ["ctrl+'"], "command": "simple_search" }
]
这样,通过 ctrl+’ 快捷键即可调用插件。
插件配置
光添加以上两个配置文件还并不能正常的起作用,还需要一个整个插件的总配置文件:SimpleSearch.sublime-commands:
[
    {
        "caption": "SimpleSearch: Settings",
        "command": "edit_settings", "args":
        {
            "base_file": "${packages}/SimpleSearch/SimpleSearch.sublime-settings",
            "default": ""
        }
    },
    {
        "caption": "SimpleSearch: Key Bindings",
        "command": "edit_settings", "args":
        {
            "base_file": "${packages}/SimpleSearch/Default (${platform}).sublime-keymap",
        }
    }
]
以上的配置引用了之前的搜素设置与快捷键配置文件,配置文件的命名其实可以随意调整,同时支持参数。例如快捷键配置文件的路径中饮用了 ${platform} 参数,该参数会让 sublime 在不同平台去引用不同的配置文件(Windows、Linux、OSX等)。
配置文件中的 caption 字段还配置了 sublime 中的 UI 选项入口,可以通过 sublime 选项进入插件设置,修改配置:

使用效果
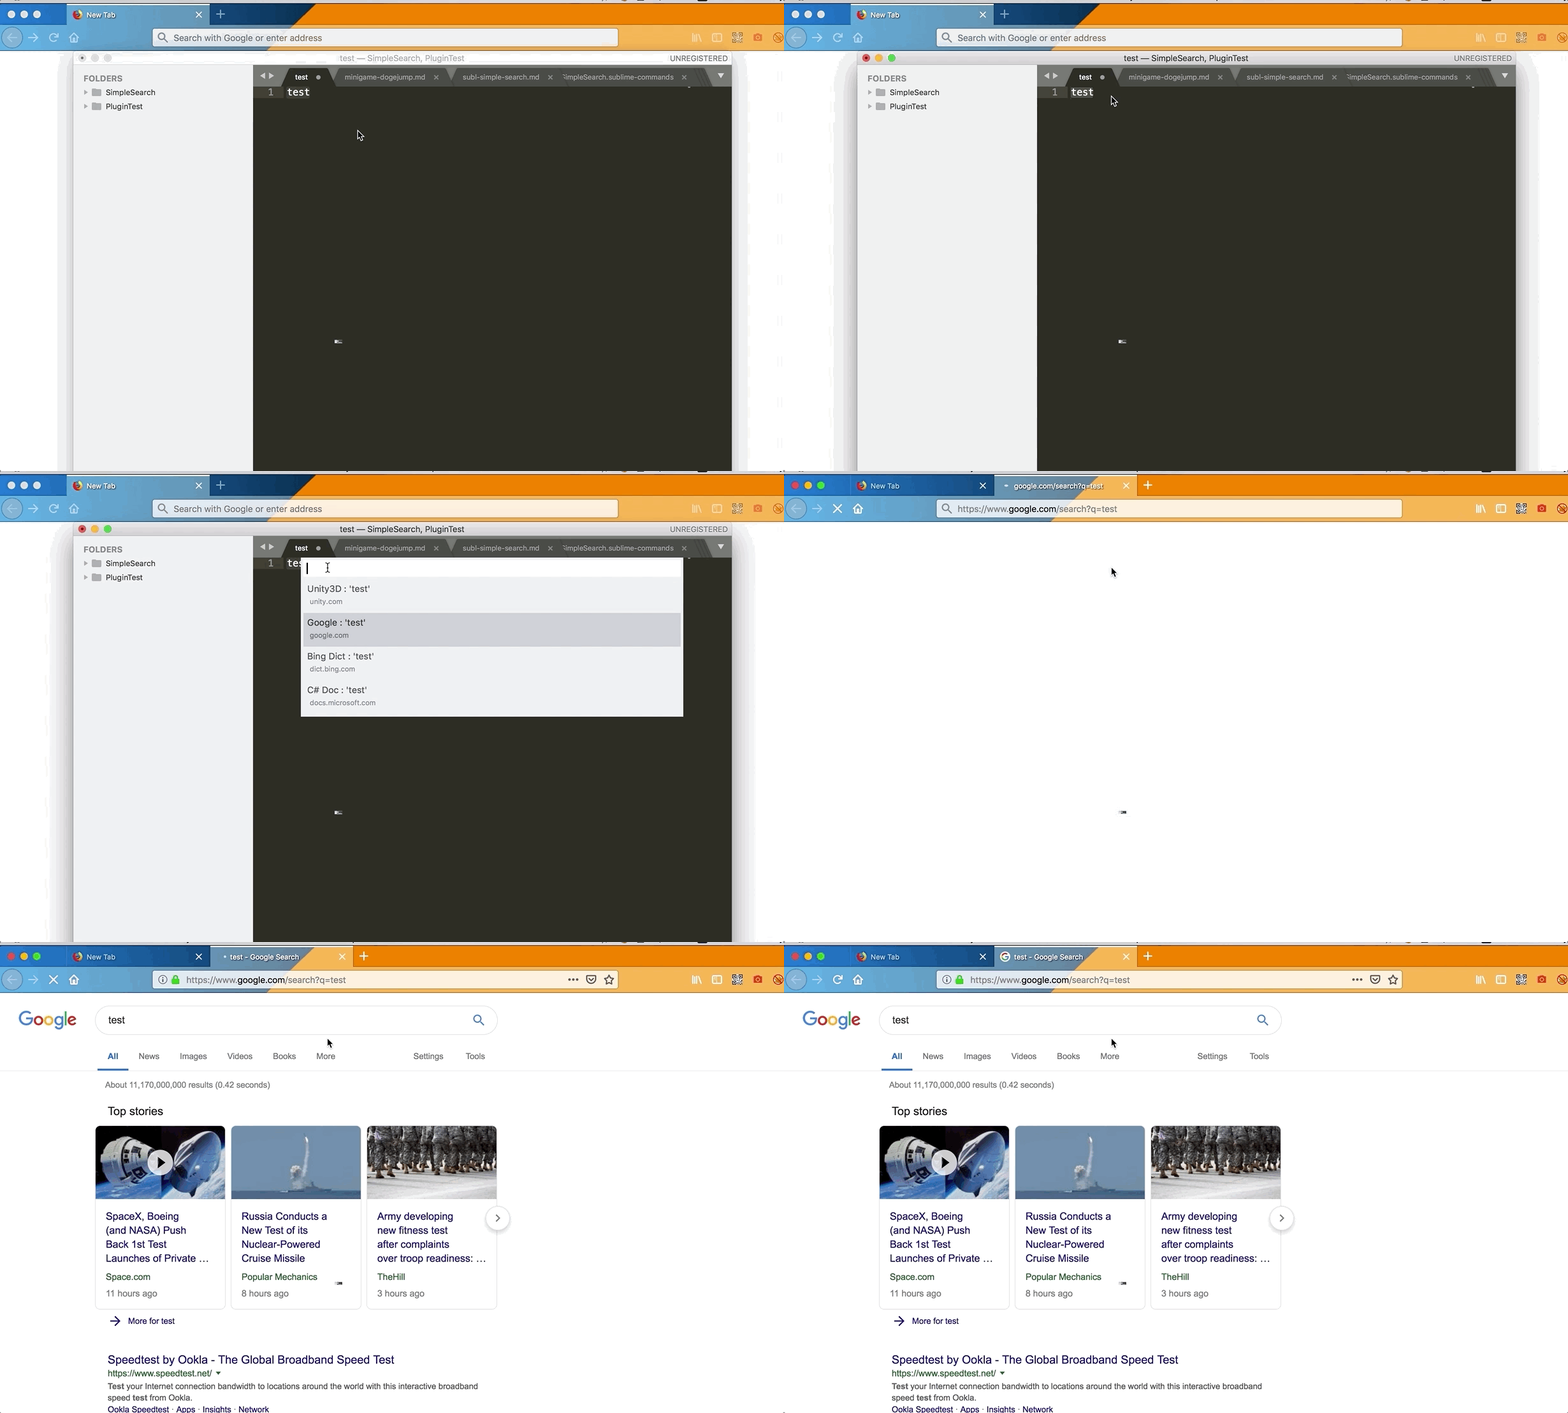
插件效果如下:
总结
看看日期,这篇文章开写的时候是2018-10-15,又是一篇拖了小半年的文章,趁着过年挤牙膏挤完了,总算了结了一件事,但愿拖延症能治。。。